Diferencia entre revisiones de «FESOL/201801/sor/manualwebhosting»
| Línea 118: | Línea 118: | ||
[[Archivo:paso 30.png]] | [[Archivo:paso 30.png]] | ||
| − | Eligimos la opciones en el siguiente orden: | + | Eligimos la opciones en el siguiente orden: <br> |
| − | Command>> D | + | Command>> D <br> |
| − | Command>> dovecot | + | Command>> dovecot <br> |
| − | Press any key to continue...<--press a key | + | Press any key to continue...<--press a key <br> |
| − | Command>>S | + | Command>>S <br> |
| − | Command>>Q | + | Command>>Q <br> |
| Línea 134: | Línea 134: | ||
===32 Crearemos directorio para los archivos temporales de squirrelmail.=== | ===32 Crearemos directorio para los archivos temporales de squirrelmail.=== | ||
| − | mkdir /var/lib/squirrelmail/tmp | + | mkdir /var/lib/squirrelmail/tmp <br> |
| − | chown www-data /var/lib/squirrelmail/tmp | + | chown www-data /var/lib/squirrelmail/tmp <br> |
| − | service apache2 reload | + | service apache2 reload <br> |
===33 Modificamos /etc/apache2/conf-enabled/squirrelmail.conf.=== | ===33 Modificamos /etc/apache2/conf-enabled/squirrelmail.conf.=== | ||
Esto servirá para que ispconfig reconozca correctamente a squirrelmail, cuando enlacemos un dominio. Descomentar las siguientes lineas: | Esto servirá para que ispconfig reconozca correctamente a squirrelmail, cuando enlacemos un dominio. Descomentar las siguientes lineas: | ||
| − | Alias /squirrelmail /usr/share/squirrelmail | + | Alias /squirrelmail /usr/share/squirrelmail <br> |
| − | Alias /webmail /usr/share/squirrelmail y luego Recargamos apache2: | + | Alias /webmail /usr/share/squirrelmail y luego Recargamos apache2: |
service apache2 reload | service apache2 reload | ||
| Línea 154: | Línea 154: | ||
Se debe dejar asi: | Se debe dejar asi: | ||
| − | <VirtualHost *:80> | + | <VirtualHost *:80> <br> |
| − | DocumentRoot /usr/share/squirrelmail | + | DocumentRoot /usr/share/squirrelmail <br> |
| − | ServerName webmail.example.com | + | ServerName webmail.example.com <br> |
| − | </VirtualHost> | + | </VirtualHost> <br> |
[[Archivo:paso 35.png]] | [[Archivo:paso 35.png]] | ||
| Línea 166: | Línea 166: | ||
Aplicamos los siguientes pasos. | Aplicamos los siguientes pasos. | ||
cd /tmp | cd /tmp | ||
| − | wget http://www.ispconfig.org/downloads/ISPConfig-3-stable.tar.gz | + | wget http://www.ispconfig.org/downloads/ISPConfig-3-stable.tar.gz <br> |
| − | tar xfz ISPConfig-3-stable.tar.gz | + | tar xfz ISPConfig-3-stable.tar.gz <br> |
| − | cd ispconfig3_install/install/ | + | cd ispconfig3_install/install/ <br> |
| − | php -q install.php | + | php -q install.php <br> |
[[Archivo:paso 36.png]] | [[Archivo:paso 36.png]] | ||
| Línea 176: | Línea 176: | ||
Installation mode (standard,expert) [standard]: <-- ENTER <br> | Installation mode (standard,expert) [standard]: <-- ENTER <br> | ||
Full qualified hostname (FQDN) of the server, eg server1.domain.tld [server1.example.com]: <-- ENTER <br> | Full qualified hostname (FQDN) of the server, eg server1.domain.tld [server1.example.com]: <-- ENTER <br> | ||
| − | MySQL server hostname [localhost]: <-- ENTER | + | MySQL server hostname [localhost]: <-- ENTER <br> |
| − | MySQL root username [root]: <-- ENTER | + | MySQL root username [root]: <-- ENTER <br> |
| − | MySQL root password []: <-- yourrootsqlpassword | + | MySQL root password []: <-- yourrootsqlpassword <br> |
| − | MySQL database to create [dbispconfig]: <-- ENTER | + | MySQL database to create [dbispconfig]: <-- ENTER <br> |
| − | MySQL charset [utf8]: <-- ENTER | + | MySQL charset [utf8]: <-- ENTER <br> |
Revisión del 22:02 6 jun 2018
Contenido
- 1 MANUAL DE INSTALACIÓN, CONFIGURACIÓN Y PRUEBAS DE ISPCONFIG
- 2 Pasos:
- 2.1 1 Instalación de servidor ssh.
- 2.2 2 Agregar lista de repositorios..
- 2.3 3 Actualizar repositorios.
- 2.4 4 Sincronizar el reloj del sistema.
- 2.5 5 Instalar: Postfix, Dovecot, MySQL, phpMyAdmin, rkhunter, binutils.
- 2.6 6 Abrir TLS / SSL y los puertos de envío en Postfix.
- 2.7 7 Reiniciar Postfix:
- 2.8 8 Configurando para que MariaDB escuche todas las interfaces.
- 2.9 9 Reiniciar MySQL.
- 2.10 10 Instalar Apache2, PHP5, phpMyAdmin, FCGI, suExec, Pear, And mcrypt.
- 2.11 11 Habilitar el Apache módulos.
- 2.12 12 Reiniciar Apache2
- 2.13 13 Instalar XCache and PHP-FPM.
- 2.14 14 Reiniciar Apache2
- 2.15 15 Instalar PHP-FPM.
- 2.16 16 Habilitar modulos y reiniciar apache2.
- 2.17 17 Instalar PureFTPd y cupos.
- 2.18 18 Configurando PureFTPd.
- 2.19 19 Habilitando sesiones FTP y TLS.
- 2.20 20 Creamos directorio para certificado SSL.
- 2.21 21 Generamos el certificado SSL.
- 2.22 22 Le damos permisos al certificado SSL.
- 2.23 23 Reiniciamos el servicio PureFTPd.
- 2.24 24 Editamos: /etc/fstab
- 2.25 25 Habilitando la cuota.
- 2.26 26 Instalamos BIND DNS Server.
- 2.27 27 Instalamos Vlogger, Webalizer, And AWStats.
- 2.28 28 Configuramos el archivo: awstats.
- 2.29 29 Instalando squirrelmail.
- 2.30 30 Configuramos SquirrelMail.
- 2.31 31 Configuramos apache para que SquirrelMail funcione correctamente.
- 2.32 32 Crearemos directorio para los archivos temporales de squirrelmail.
- 2.33 33 Modificamos /etc/apache2/conf-enabled/squirrelmail.conf.
- 2.34 34 Analizamos que todo funciona correctamente.
- 2.35 35 Instalar ISPConfig 3.
MANUAL DE INSTALACIÓN, CONFIGURACIÓN Y PRUEBAS DE ISPCONFIG
Pasos:
1 Instalación de servidor ssh.
Con el comando apt-get install ssh openssh-server.
2 Agregar lista de repositorios..
Con cualquier editor de texto ingresamos a archivo sources.list nano /etc/apt/sources.list.
3 Actualizar repositorios.
Con el comando apt-get update y apt-get upgrade.
4 Sincronizar el reloj del sistema.
Con el comando apt-get install ntp ntpdate.
5 Instalar: Postfix, Dovecot, MySQL, phpMyAdmin, rkhunter, binutils.
Con los comandos: apt-get install postfix postfix-mysql postfix-doc mariadb-client mariadb-server openssl getmail4 rkhunter binutils dovecot-imapd dovecot-pop3d dovecot-mysql dovecot-sieve dovecot-lmtpd
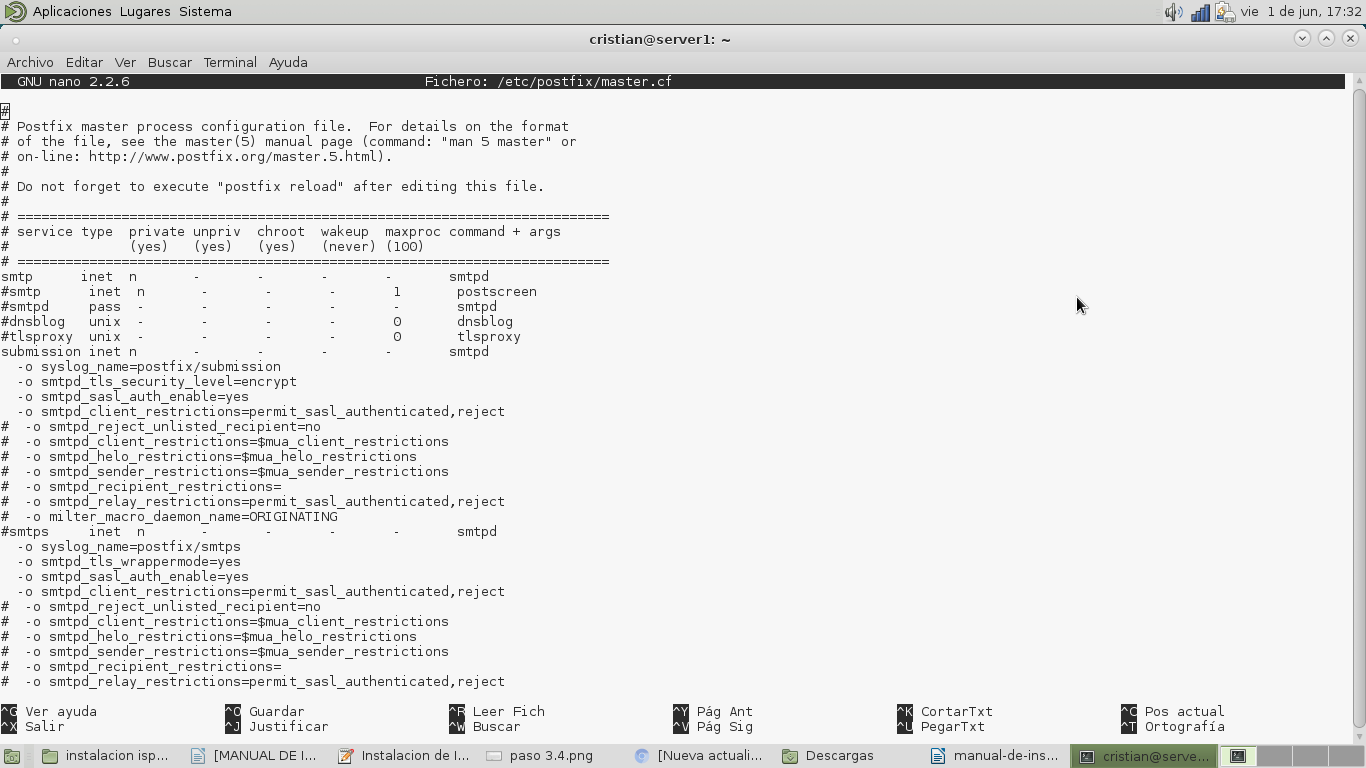
6 Abrir TLS / SSL y los puertos de envío en Postfix.
7 Reiniciar Postfix:
Con el comando service postfix restart.
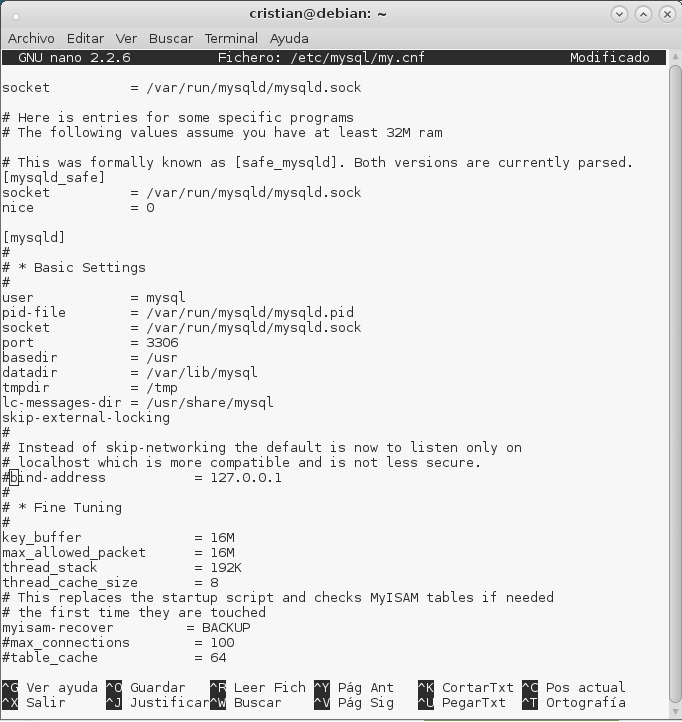
8 Configurando para que MariaDB escuche todas las interfaces.
Editamos /etc/mysql/my.cnf y comentamos la línea bind-address = 127.0.0.1, para que no solo escuche en el localhost.
9 Reiniciar MySQL.
Con el comando: service mysql restart.
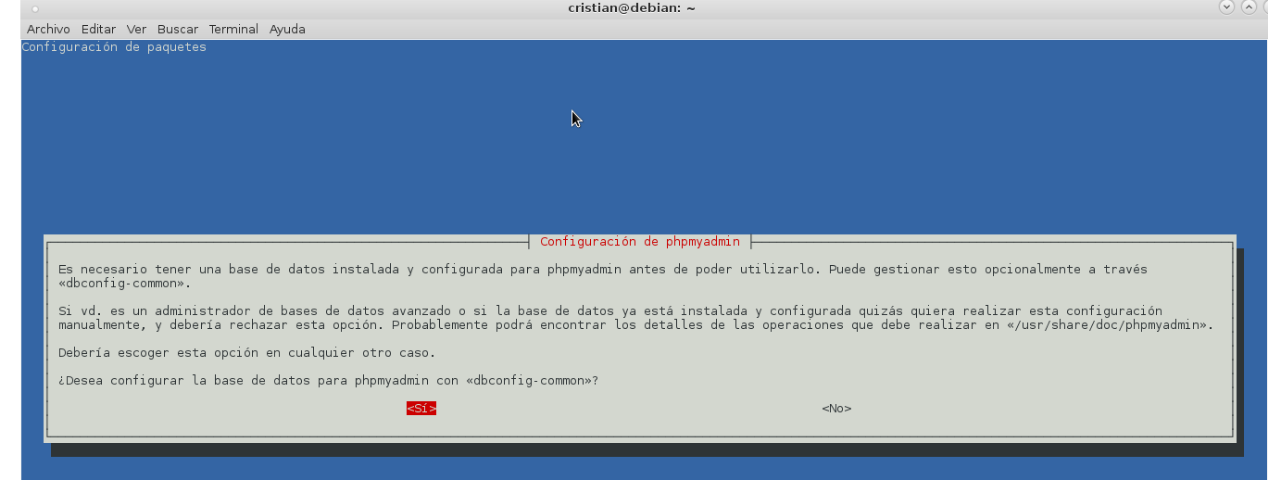
10 Instalar Apache2, PHP5, phpMyAdmin, FCGI, suExec, Pear, And mcrypt.
Con los comandos: apt-get install apache2 apache2.2-common apache2-doc apache2-mpm-prefork apache2-utils libexpat1 ssl-cert libapache2-mod-php5 php5 php5-common php5-gd php5-mysql php5-imap phpmyadmin php5-cli php5-cgi libapache2-mod-fcgid apache2-suexec php-pear php-auth php5-mcrypt mcrypt php5-imagick imagemagick libruby libapache2-mod-python php5-curl php5-intl php5-memcache php5-memcached php5-pspell php5-recode php5-sqlite php5-tidy php5-xmlrpc php5-xsl memcached libapache2-mod-passenger
11 Habilitar el Apache módulos.
Con el comando: a2enmod suexec rewrite ssl actions include dav_fs dav auth_digest cgi.
12 Reiniciar Apache2
Con el comando: service apache2 restart.
13 Instalar XCache and PHP-FPM.
Con el comando: apt-get install php5-xcache.
14 Reiniciar Apache2
Con el comando: service apache2 restart.
15 Instalar PHP-FPM.
Con el comando: apt-get install libapache2-mod-fastcgi php5-fpm.
16 Habilitar modulos y reiniciar apache2.
Utilizaremos los comandos: a2enmod actions fastcgi alias. service apache2 restart.
17 Instalar PureFTPd y cupos.
Con los comandos: apt-get install pure-ftpd-common pure-ftpd-mysql quota quotatool.
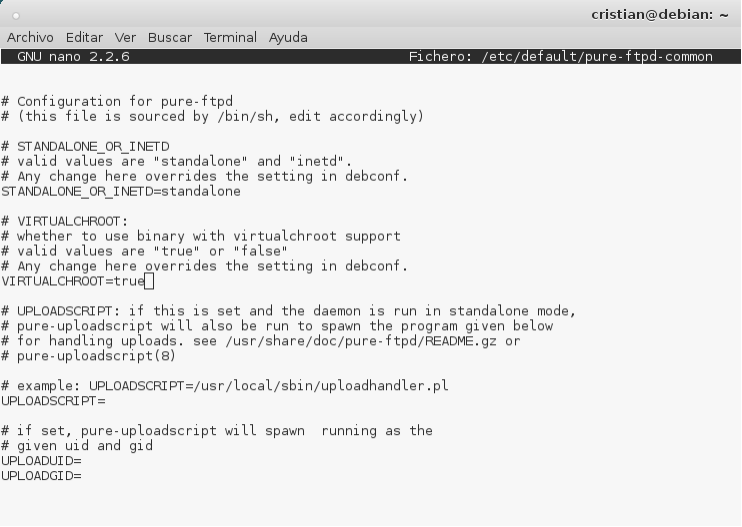
18 Configurando PureFTPd.
Editar el archivo /etc/default/pure-ftpd-common. Descomentar las lineas STANDALONE_OR_INETD=standalone y VIRTUALCHROOT=true, en algunos ya viene asi por defecto.
19 Habilitando sesiones FTP y TLS.
Con el comando: echo 1 > /etc/pure-ftpd/conf/TLS.
20 Creamos directorio para certificado SSL.
Con el comando: mkdir -p /etc/ssl/private/
21 Generamos el certificado SSL.
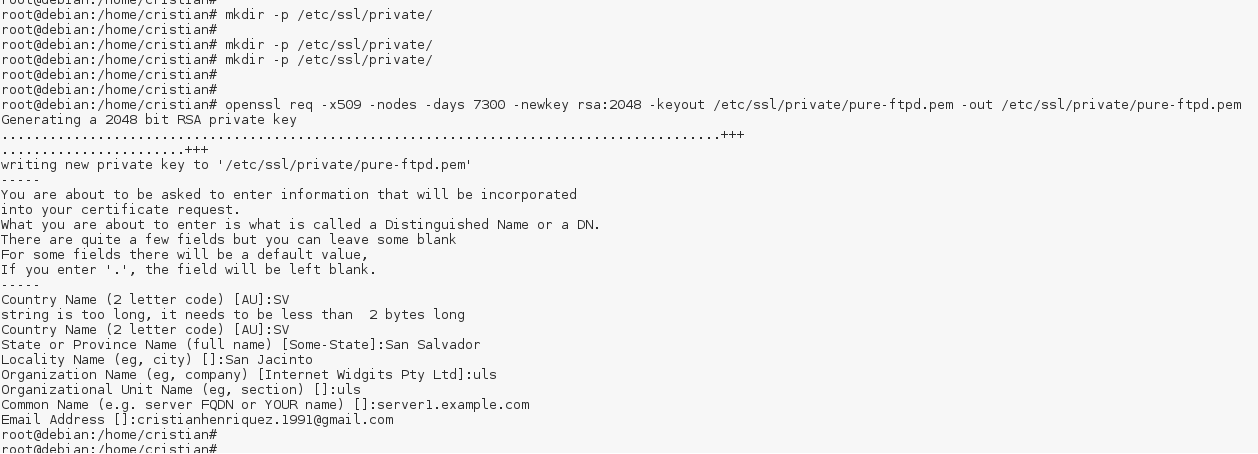
Utlizaremo el siguiente comando: openssl req -x509 -nodes -days 7300 -newkey rsa:2048 -keyout /etc/ssl/private/pure-ftpd.pem -out /etc/ssl/private/pure-ftpd.pem. Deberás llenar los datos que se pidan, según la siguiente imagen.
22 Le damos permisos al certificado SSL.
Con el comando: chmod 600 /etc/ssl/private/pure-ftpd.pem.
23 Reiniciamos el servicio PureFTPd.
Utilizando el comando: service pure-ftpd-mysql restart.
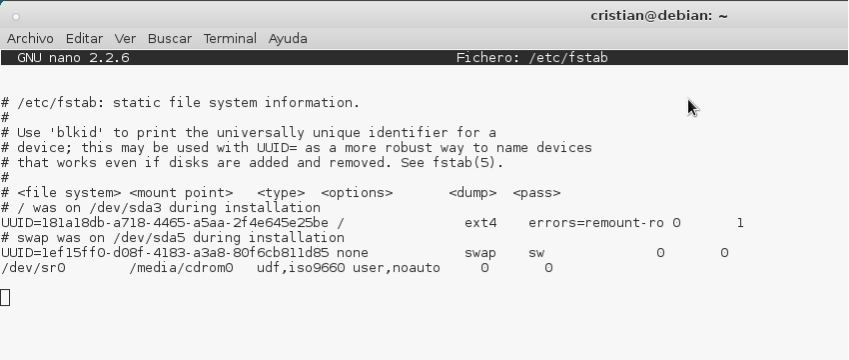
24 Editamos: /etc/fstab
Lo dejaremos con aparece en la imagen siguiente.
25 Habilitando la cuota.
Ejecutando los siguientes comandos: mount -o remount / quotacheck -avugm quotaon -avug.
26 Instalamos BIND DNS Server.
Con el comando: apt-get install bind9 dnsutils.
27 Instalamos Vlogger, Webalizer, And AWStats.
Con el comando: apt-get install vlogger webalizer awstats geoip-database libclass-dbi-mysql-perl.
28 Configuramos el archivo: awstats.
Editamos el archivo: nano /etc/cron.d/awstats. Lo dejamos como se muestra en la imagen:
29 Instalando squirrelmail.
Con el comando siguiente: apt-get install squirrelmail.
30 Configuramos SquirrelMail.
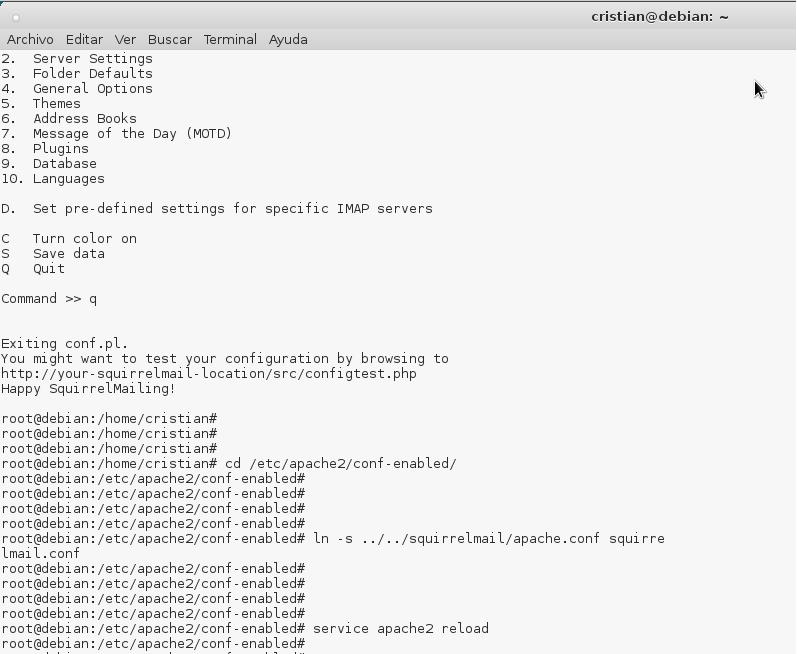
Con el comando squirrelmail-configure, se abrirá la una ventana y la configuraremos tal como se ve en la imagen siguiente.
Eligimos la opciones en el siguiente orden:
Command>> D
Command>> dovecot
Press any key to continue...<--press a key
Command>>S
Command>>Q
31 Configuramos apache para que SquirrelMail funcione correctamente.
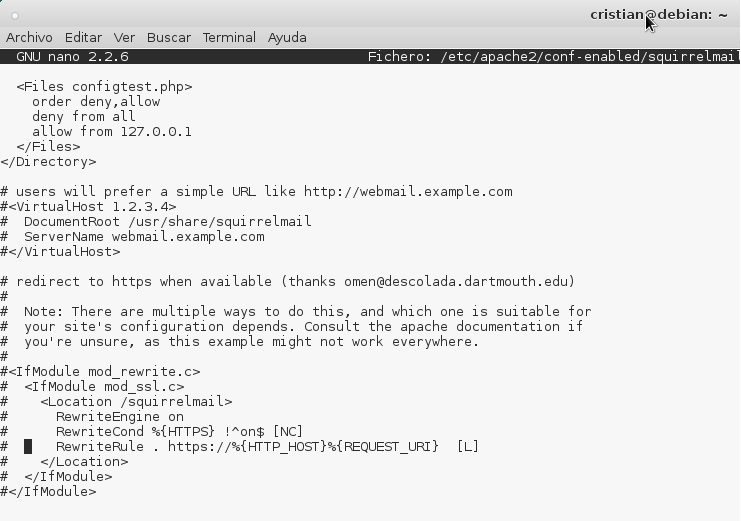
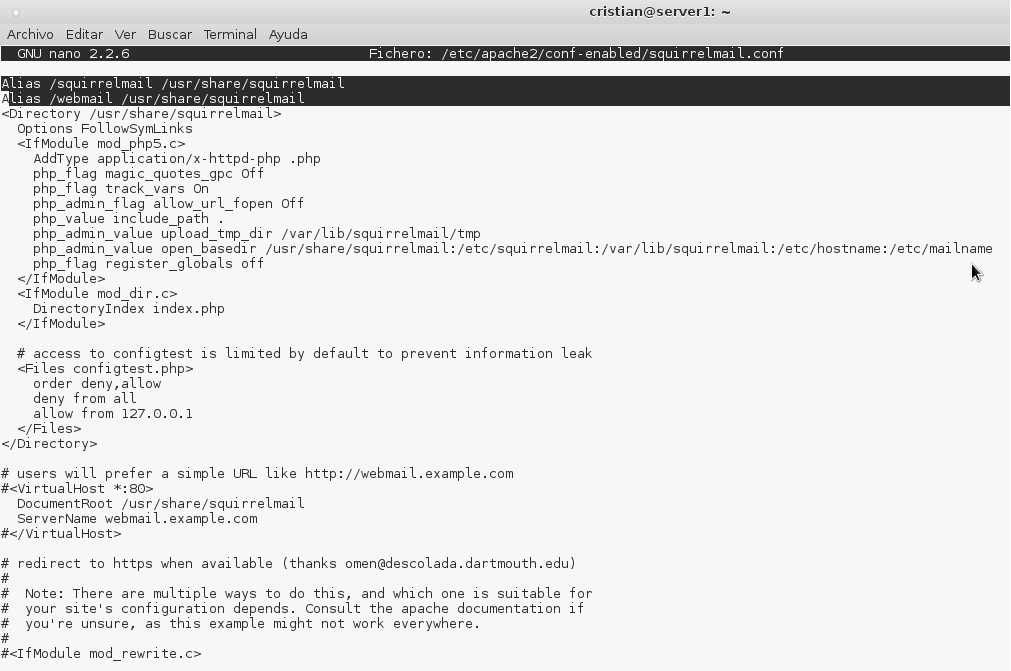
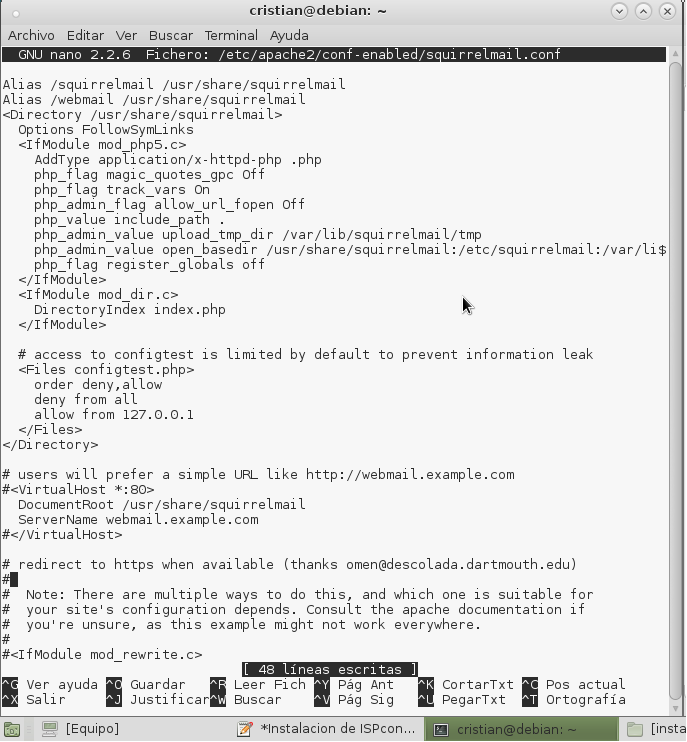
Primero ingresamos a la carpeta cd /etc/apache2/conf-enabled/, luego ejucutamos el siguiente comnado: ln -s ../../squirrelmail/apache.conf squirrelmail.conf, despues reiniciamos apache: service apache2 reload. Editamos el archivo: nano /etc/apache2/conf-enabled/squirrelmail.conf. Lo dejaremos como se muestra en la imagen siguiente:
32 Crearemos directorio para los archivos temporales de squirrelmail.
mkdir /var/lib/squirrelmail/tmp
chown www-data /var/lib/squirrelmail/tmp
service apache2 reload
33 Modificamos /etc/apache2/conf-enabled/squirrelmail.conf.
Esto servirá para que ispconfig reconozca correctamente a squirrelmail, cuando enlacemos un dominio. Descomentar las siguientes lineas:
Alias /squirrelmail /usr/share/squirrelmail
Alias /webmail /usr/share/squirrelmail y luego Recargamos apache2:
service apache2 reload
34 Analizamos que todo funciona correctamente.
Ingresamos al navegador con la url siguiente: http://192.168.1.100/webmail
Si desea definir un host virtual como: webmail.example.com, donde los usuarios pueden acceder a SquirrelMail, habría que agregar la siguiente configuración de host virtual para /etc/apache2/conf-enabled/squirrelmail.conf : Se debe dejar asi:
<VirtualHost *:80>
 DocumentRoot /usr/share/squirrelmail

 ServerName webmail.example.com
</VirtualHost>
Reiniciamos apache2: /etc/init.d/apache2 reload
35 Instalar ISPConfig 3.
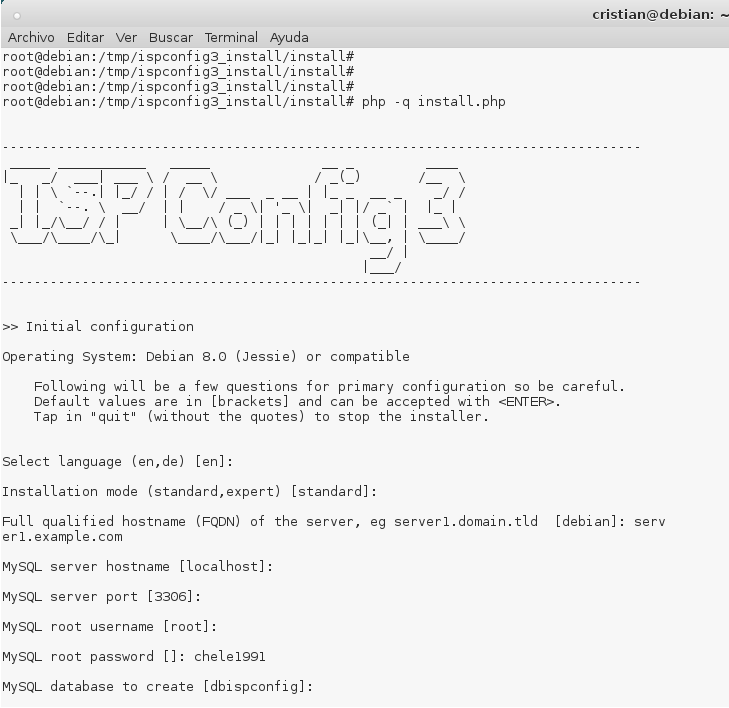
Aplicamos los siguientes pasos.
cd /tmp
wget http://www.ispconfig.org/downloads/ISPConfig-3-stable.tar.gz
tar xfz ISPConfig-3-stable.tar.gz
cd ispconfig3_install/install/
php -q install.php
Select language (en,de) [en]: <-- ENTER
Installation mode (standard,expert) [standard]: <-- ENTER
Full qualified hostname (FQDN) of the server, eg server1.domain.tld [server1.example.com]: <-- ENTER
MySQL server hostname [localhost]: <-- ENTER
MySQL root username [root]: <-- ENTER
MySQL root password []: <-- yourrootsqlpassword
MySQL database to create [dbispconfig]: <-- ENTER
MySQL charset [utf8]: <-- ENTER
